Diagnostic Tests
-
Performing an Electrocardiogram (EKG/ECG)
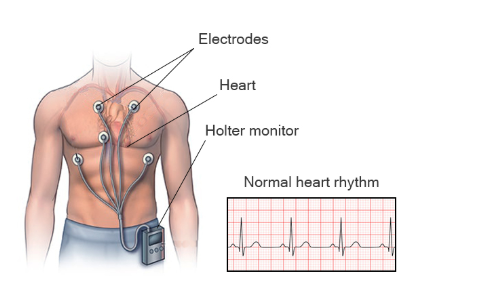
Overview of Electrocardiogram (EKG/ECG): An Electrocardiogram (ECG or EKG) is a non-invasive diagnostic tool used to assess the electrical activity of the heart. It provides essential information about the heart’s rhythm, electrical conduction pathways, and overall function. The EKG records the electrical impulses that trigger the contraction of the heart muscle, allowing for the detection of abnormalities like arrhythmias, ischemia, and heart attacks.
Indications for an EKG:
- Chest pain, shortness of breath, dizziness, or fainting.
- Suspected heart attacks, arrhythmias, or heart block.
- Routine preoperative assessment for patients with cardiac risk factors.
- Monitoring patients with known cardiac conditions.
- Evaluating effects of medications on heart function.
Procedure for Performing an Electrocardiogram (EKG):
- Preparation:
- Verify Patient Identity: Ensure the correct patient is being tested.
- Explain the Procedure: Calmly explain the procedure to the patient, including its purpose and duration.
- Patient Positioning: Have the patient lie down in a comfortable position, ensuring they are relaxed and not shivering.
- Skin Preparation: Ensure that the skin is free of oils, lotions, or other substances that could interfere with electrode adhesion. Use alcohol swabs to clean the skin if necessary.
- Electrode Placement: Attach electrodes to specific locations on the chest, arms, and legs. The standard 12-lead ECG requires 10 electrodes, including 6 precordial (chest) leads and 4 limb leads. Correct placement is crucial for accurate results.
- Conducting the Test:
- Monitor Lead Placement: Ensure that the electrodes are properly positioned and have good contact with the skin.
- Initiate the ECG: Start the ECG machine and ensure that the tracings are being recorded correctly.
- Monitor the Test: Observe the waveform on the ECG monitor, checking for any irregularities such as abnormal heart rates or rhythms.
- Duration: A typical ECG lasts around 5–10 minutes, although a stress test ECG may last longer.
- Post-Procedure Care:
- Remove Electrodes: Gently remove the electrodes from the patient’s skin.
- Inspect for Skin Irritation: Ensure there is no irritation from the electrode adhesive, and if there is, clean the area with water or an appropriate skin cleanser.
- Ensure Comfort: Check on the patient’s comfort after the procedure, as some patients may experience anxiety or discomfort during the test.
- Interpretation and Documentation: The ECG is typically reviewed by a physician or cardiologist. Document the test results and any relevant patient information (e.g., symptoms, medications).
Common ECG Findings and Their Significance:
- Normal Sinus Rhythm: Regular rhythm originating from the sinoatrial (SA) node with a rate of 60-100 bpm.
- Bradycardia: A slower-than-normal heart rate, typically under 60 bpm, indicating a possible conduction problem or vagal response.
- Tachycardia: A fast heart rate, usually above 100 bpm, which may indicate stress, fever, or an underlying cardiac condition.
- Atrial Fibrillation (AFib): An irregularly irregular rhythm with no distinct P waves and an erratic ventricular response, increasing the risk of stroke.
- Myocardial Infarction (MI): ST elevation or depression on the ECG indicates ischemia or infarction of heart tissue.
- Heart Blocks: Delayed or blocked electrical conduction between the atria and ventricles, as seen in varying degrees of AV block.
Reinforcing Client Teaching About ECG:
- Explain the Non-Invasive Nature: Inform patients that the procedure is painless and only involves the attachment of small adhesive electrodes to the skin.
- Discuss Possible Sensations: While the test itself is not painful, the patient may experience a mild sensation as the electrodes are applied, but this should not be uncomfortable.
- Pre-test Instructions: Advise the patient to avoid excessive movement or talking during the test, as this can interfere with the recording.
- Post-test Instructions: If the patient experiences any discomfort or irritation from the electrodes, recommend gentle washing of the area with water.
-
Performing Diagnostic Testing (e.g., Blood Glucose, Oxygen Saturation, Testing for Occult Blood)

Blood Glucose Testing:
Overview: Blood glucose testing is a common diagnostic test used to monitor and manage diabetes, assess hypoglycemia, or evaluate metabolic conditions. Blood glucose levels can be measured through fingerstick testing, venipuncture, or continuous glucose monitoring systems (CGMs).
Indications for Blood Glucose Testing:
- Monitoring diabetes (Type 1 and Type 2).
- Suspected hypoglycemia or hyperglycemia.
- During illness or stress, which can affect blood glucose control.
- Preoperative assessment or routine health checks.
Procedure for Blood Glucose Testing (Fingerstick Method):
- Preparation:
- Patient Identification: Verify patient details and ensure that they understand the procedure.
- Hand Hygiene: Wash hands thoroughly and ensure that the patient’s hands are clean and dry.
- Select the Site: The lateral surface of the fingertip is usually chosen to avoid pain and calluses. Avoid using the thumb as it may produce inaccurate readings.
- Prepare the Equipment: Use a glucose meter, test strip, lancet, and gauze or alcohol wipe.
- Testing:
- Apply the Lancet: Use a lancet to prick the fingertip, avoiding too deep a puncture, which may cause unnecessary pain.
- Collect the Sample: Allow a small drop of blood to form. Wipe away the first drop as it may contain tissue fluid that can alter the result.
- Apply the Blood to the Test Strip: Place the blood onto the test strip, which is inserted into the glucose meter.
- Wait for Results: The glucose meter will typically provide results in 5-30 seconds.
- Post-test Care:
- Dispose of the Lancet and Test Strip: Follow proper disposal guidelines to prevent needle-stick injuries.
- Bandage the Puncture Site: Apply a small bandage to the puncture site if necessary.
- Record and Interpret the Result: Document the blood glucose level and compare it to normal ranges (typically 70-110 mg/dL for fasting blood glucose).
Oxygen Saturation (SpO2) Testing:
Overview: Oxygen saturation (SpO2) testing measures the percentage of hemoglobin in the blood that is saturated with oxygen. It provides insight into a patient’s respiratory and circulatory efficiency.
Indications for Oxygen Saturation Testing:
- Respiratory or cardiac issues, including COPD, asthma, or heart failure.
- Monitoring patients on oxygen therapy or post-operatively.
- Detecting early signs of hypoxemia.
Procedure for Measuring Oxygen Saturation (Pulse Oximeter):
- Preparation:
- Select the Sensor Site: Common sites include the finger, toe, or earlobe.
- Clean the Site: Ensure the site is clean and free of nail polish or artificial nails that may interfere with readings.
- Testing:
- Place the Sensor: Attach the pulse oximeter probe to the selected site.
- Wait for the Reading: The pulse oximeter will display the oxygen saturation within seconds.
- Post-test Care:
- Record the Result: Normal SpO2 is typically 95-100%. Below 90% may indicate respiratory distress or other issues requiring intervention.
- Monitor for Symptoms: If SpO2 is low, assess the patient’s breathing, mental status, and oxygen supplementation needs.
Testing for Occult Blood (Fecal Occult Blood Test – FOBT):
Overview: The fecal occult blood test (FOBT) detects hidden (occult) blood in the stool, which may indicate conditions like gastrointestinal bleeding, colorectal cancer, or hemorrhoids.
Indications for Occult Blood Testing:
- Routine screening for colorectal cancer, especially in patients over 50.
- Evaluation of gastrointestinal bleeding from ulcers, hemorrhoids, or inflammatory bowel disease.
Procedure for Performing FOBT:
- Preparation:
- Provide Instructions: Instruct the patient to avoid certain foods and medications (e.g., red meat, vitamin C) for a few days before the test, as these can affect results.
- Collect Stool Sample: Provide the patient with a test kit, which usually includes a small sample collection device and a test card.
- Testing:
- Apply Stool to the Test Card: The patient collects a small stool sample and places it on a designated section of the card.
- Apply Reagents: The nurse applies a reagent to the sample, which changes color if blood is present.
- Post-test Care:
- Interpret the Results: If the test is positive, further investigation (e.g., colonoscopy) is usually required.
- Patient Education: Explain the importance of follow-up testing and potential treatments.
-
Reinforcing Client Teaching About Diagnostic Tests

Overview: Reinforcing client education about diagnostic tests is crucial for promoting patient cooperation, reducing anxiety, and ensuring the correct interpretation of results.
Key Considerations for Client Teaching:
- Explain the Purpose: Clearly explain why the test is being done, what it aims to detect, and how the results will be used.
- Address Concerns: Address any questions or concerns the patient may have, especially regarding the invasiveness or discomfort of the test.
- Provide Pre-test Instructions: Offer detailed instructions regarding preparation, such as fasting for blood tests, avoiding certain foods or medications, and ensuring a clean sample for urine or stool tests.
- Post-test Education: Provide guidance on post-test care, including expected results, when to expect follow-up communication, and any necessary lifestyle adjustments or treatment interventions.
- Offer Emotional Support: Many diagnostic tests, especially invasive ones, can cause anxiety. Be empathetic and provide reassurance to the patient.