Laboratory Values
-
Compare Client Laboratory Values to Normal Laboratory Values

Overview: Laboratory tests are fundamental for assessing a patient’s health status and aiding in the diagnosis and management of various conditions. Nurses must compare client laboratory values to normal laboratory ranges to assess whether the results are within expected limits and identify potential abnormalities.
Normal Laboratory Values: Here are a few common laboratory values that are frequently assessed in clinical settings:
- Complete Blood Count (CBC):
- Hemoglobin (Hb):
- Normal ranges: Men: 13.8–17.2 g/dL, Women: 12.1–15.1 g/dL.
- Low hemoglobin may indicate anemia, blood loss, or chronic disease.
- High levels may suggest dehydration or polycythemia.
- White Blood Cell Count (WBC):
- Normal range: 4,500–11,000 cells/mcL.
- Elevated WBC can indicate infection, inflammation, or leukemia.
- Low WBC may suggest bone marrow suppression or viral infections.
- Platelets:
- Normal range: 150,000–450,000 cells/mcL.
- Low platelets can lead to bleeding disorders (thrombocytopenia).
- High levels may suggest risk of clotting or platelet production disorders.
- Hemoglobin (Hb):
- Basic Metabolic Panel (BMP):
- Sodium (Na+):
- Normal range: 136–145 mEq/L.
- Abnormal levels may indicate dehydration, kidney disease, or electrolyte imbalance.
- Potassium (K+):
- Normal range: 3.5–5.0 mEq/L.
- Low levels (hypokalemia) can cause arrhythmias, while high levels (hyperkalemia) can lead to cardiac arrest.
- Blood Urea Nitrogen (BUN):
- Normal range: 7–20 mg/dL.
- Elevated levels may indicate kidney dysfunction, dehydration, or high-protein diets.
- Creatinine (Cr):
- Normal range: 0.6–1.2 mg/dL.
- High levels may indicate renal impairment or kidney failure.
- Sodium (Na+):
- Liver Function Tests (LFTs):
- Alanine Aminotransferase (ALT):
- Normal range: 7–56 units/L.
- Elevated levels may indicate liver damage or hepatitis.
- Aspartate Aminotransferase (AST):
- Normal range: 10–40 units/L.
- High AST levels are associated with liver disease or muscle damage.
- Alanine Aminotransferase (ALT):
- Coagulation Profile:
- Prothrombin Time (PT):
- Normal range: 11–13.5 seconds.
- Prolonged PT can indicate clotting disorders or anticoagulant therapy.
- International Normalized Ratio (INR):
- Normal range: 0.8–1.1.
- An elevated INR indicates a higher risk of bleeding.
- Prothrombin Time (PT):
Nursing Implications:
- Nurses must understand normal laboratory ranges and compare them to client results to assess potential clinical significance.
- Deviations from normal ranges require further investigation and potential intervention, such as medication adjustments or further diagnostic tests.
- Recognizing abnormal values and understanding their clinical implications can help identify early signs of disease or complications.
-
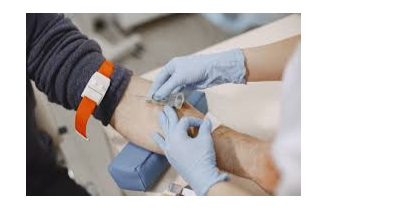
Perform Venipuncture for Blood Draws
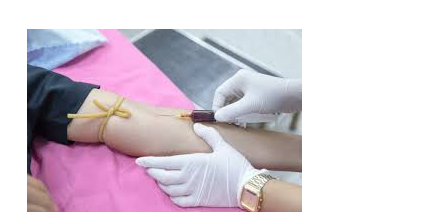
Overview: Venipuncture is the process of obtaining a blood sample by puncturing a vein. It is an essential skill that nurses need to master for a variety of diagnostic tests.
Procedure for Venipuncture:
- Preparation:
- Identify the Patient: Verify the patient’s identity to ensure the correct procedure.
- Explain the Procedure: Ensure the patient understands the purpose of the blood draw and what to expect.
- Select the Vein: Common sites include the median cubital vein (antecubital fossa), cephalic vein, and basilic vein. Choose a vein that is visible, palpable, and away from large arteries or nerves.
- Gather Supplies: You will need gloves, tourniquet, alcohol wipes, blood collection tubes, needle (usually 21-23 gauge), and gauze.
- Performing the Blood Draw:
- Apply Tourniquet: Apply the tourniquet 4–6 inches above the venipuncture site to engorge the veins.
- Clean the Site: Use an alcohol wipe to clean the site in a circular motion, moving outward from the center.
- Insert Needle: Hold the needle at a 15–30° angle to the skin, and insert it bevel-up. Ensure that the needle is in the vein before drawing blood.
- Collect Blood: Allow the blood to flow into the collection tube. If multiple tubes are required, follow the correct order of draw (e.g., blood cultures first, followed by tubes for serum, etc.).
- Withdraw Needle and Apply Pressure: Once blood collection is complete, withdraw the needle and immediately apply pressure with gauze to prevent hematoma formation.
- Post-Procedure Care:
- Apply Bandage: After bleeding stops, apply a bandage to the site.
- Dispose of Equipment: Safely dispose of the needle and other used supplies.
- Document the Procedure: Record the procedure in the patient’s chart, including the site and any complications.
Complications:
- Hematoma, hematoma formation, or accidental arterial puncture.
- Pain or discomfort during or after venipuncture.
- Infection at the site of insertion.
-
Perform Blood Glucose Monitoring
Overview: Blood glucose monitoring is essential in managing diabetes, hypoglycemia, and hyperglycemia. Regular monitoring helps guide treatment decisions and lifestyle adjustments.
Procedure for Blood Glucose Monitoring:
- Preparation:
- Identify the Patient: Confirm the patient’s identity.
- Gather Supplies: You will need a glucose meter, test strips, a lancet, cotton ball or gauze, and alcohol wipes.
- Explain the Procedure: Describe the process to the patient and provide reassurance.
- Blood Glucose Test:
- Prepare the Finger: Clean the patient’s fingertip with an alcohol wipe and allow it to dry to prevent interference with the test.
- Prick the Finger: Use a lancet to puncture the side of the fingertip.
- Apply Blood to the Strip: Place a small drop of blood onto the test strip inserted into the glucose meter.
- Read Results: Wait for the glucose meter to display the results, which should take a few seconds.
- Post-Test Care:
- Dispose of Lancet: Safely dispose of the lancet in a sharps container.
- Record the Results: Document the results in the patient’s chart, noting the time of testing.
- Provide Teaching: Teach the patient how to interpret the results and when to seek help for abnormal readings.
Complications:
- Pain or discomfort at the puncture site.
- Inaccurate readings due to poor blood flow, expired test strips, or improper technique.
-
Collect Specimen for Diagnostic Testing (e.g., Blood, Urine, Stool, Sputum)
Overview: Specimen collection is vital for diagnosing various medical conditions. Different types of specimens are needed for different tests (e.g., urine cultures, blood counts, stool cultures).
Blood Specimen Collection:
- Prepare the Site: Use proper technique for venipuncture (described above).
- Label the Sample: Always label the sample with the patient’s name, date, time, and the type of test required.
Urine Specimen Collection:
- Clean-Catch Midstream: For a urine culture, ask the patient to clean the genital area with a sterile wipe and collect the urine midstream in a sterile container.
- 24-Hour Urine Collection: Instruct the patient to void first thing in the morning and collect all urine over a 24-hour period.
Stool Specimen Collection:
- Collect from the Center: Use a sterile container to collect stool, ensuring no contamination with urine.
- Send for Testing: Stool samples may be tested for occult blood, pathogens, or parasites.
Sputum Specimen Collection:
- Ask the Patient to Cough: For sputum cultures, have the patient cough deeply and expectorate into a sterile container.
- Send Immediately: Sputum specimens should be sent to the lab immediately to ensure accurate results.
-
Maintain Central Venous Catheter (CVC)

Overview: Central venous catheters are used for long-term access to the veins, especially for administering medications, fluids, or drawing blood.
Maintenance of a CVC:
- Inspect the Site Regularly: Check for signs of infection or complications such as swelling, redness, or discharge.
- Flush the Catheter: Use saline or heparin as per protocol to maintain patency.
- Sterile Technique: Ensure aseptic technique when changing dressings or accessing the catheter.
-
Reinforce Client Teaching on Purposes of Laboratory Tests

Client education is crucial in ensuring compliance and reducing anxiety about diagnostic tests. Reinforce the purpose of each test and how it helps in diagnosis or treatment planning.
-
Monitor Diagnostic or Laboratory Test Results
Nurses must regularly monitor laboratory results and interpret them in the context of the patient’s clinical condition. For example, trends in blood glucose or electrolyte levels can indicate deterioration or improvement.
-
Notify Primary Health Care Provider about Client Laboratory Test Results
Timely notification of abnormal laboratory results is essential for prompt medical intervention. Establish a system for prioritizing critical results and communicating them efficiently to the healthcare team.